The Old West Exhibit, Sylvan Gallery, Feb 4th, 613 Ortiz, Sand City, 2-6PM

Please join us Saturday, Feb 4th for Photography and Music at the Sylvan Gallery, 613 Ortiz Ave, Sand City, 2-6 PM. Music by Rags Rosenberg of Rags & Bones will perform for us from 3-5 PM. Rags Rosenberg writes Mythopoetic Folk-Rock in the tradition of the songwriter-poets he admires: Cohen, Dylan and Waits to name a few. Our host this Saturday is Fernando Batista. Come and hang out with the artists and find out the story behind the images. Barbara Moon Batista, Sylvia Gardner, Martha Hogan and Nita Griffin will be in the gallery as well. See you soon. Barbara

Exhibit, Images of The Old West, January 28th, Sylvan Gallery, 2-6 PM

You are invited to join us and celebrate The Old West Exhibit on January 28th at at the Sylvan Gallery, 613 Ortiz Unit A, Sand City 2-6 PM. A great way to start 2023. Sylvia Gardner is your hostess. This is your chance to speak with Sylvia one on one about her experience at Fort Churchill, Nevada and see her images. We look forward to seeing you on Saturday as well. Barbara and Fernando Batista, Batista Moon Studio.

Row of Adobes, Fort Churchill, Nevada

Photo by Sylvia Gardner

Black Friday 20% Discount on Lightroom Classic Tutoring

IRRESISTIBLE OFFER, BLACK FRIDAY 20% OFF LIGHTROOM CLASSIC TUTORING - IF THE LINK TO THE ORDER PAGE DOESN’T WORK, EMAIL ME barbara@batistamoon.com AND I WILL ANSWER QUESTIONS, ASSIST IN PURCHASE. LOOKING FORWARD TO ASSISTING YOU IN YOUR LEARNING OR THE PHOTOGRAPHER ON YOUR LIST. HAPPY T-DAY AND GRATITUDE FOR YOUR PURCHASE. BARBARA

Lightroom Classic Refresher Week 5 BACKING UP YOUR CATALOG

“When you quit Lightroom, you’ll notice that from time to time it will

bring up the Back Up Catalog dialog, giving you the opportunity to make a

backup of your all-important catalog (it has all your edits, sorting,

metadata, Pick flags, etc., stored in its database”

At the top, it has a popup menu where you can choose how often to bring up this backup dialog, giving you the opportunity to back up from once a day to once a month (I

would choose how often to back up based on how many days of work you’re willing to lose if your catalog did become corrupt, and you had to use a backup catalog). By default, it stores this backup in a folder called

(wait for it…wait for it…) “Backups” inside the Lightroom folder where your regular catalog is stored on your computer. That’s okay, as long as your computer’s hard drive doesn’t ever crash or your computer doesn’t

get stolen.”” Quote from Scott Kelby

I like the choice of Every time Lightroom exists. It gives me a choice and I can evaluate based on the amount of activity I have done in the session.

“That’s why I recommend saving your backup to an external hard drive or to the cloud. In case the

unthinkable happens, you’ve got a backup stored somewhere else. To change where your backup catalog is stored, click the Choose button to the right of Backup Folder. I leave the two checkboxes turned on, so when it does the backup, it tests it to make sure nothing’s wrong with it, and it optimizes the backup catalog, as well. Both are well worth having it do for you.

“So, what do you do if “the unthinkable” happens: you launch Lightroom one day, and you get a warning dialog letting you know that your catalog is “...corrupt and cannot be used or backed up until it is repaired”? Well, first you’d click the

Repair Catalog button, and say a few prayers, and with any luck at all it will fix whatever was wrong with your

catalog, and you’re back up and running. But, what if, for whatever reason, you get the dialog seen hereat the bottom and it can’t repair yourcatalog? Well, we go to Plan B.” Quote Scott Kelby

“Plan B is to restore your latest backup copy of your catalog. Here’s how: In the “I can’t repair your catalog” second warning dialog, click the Choose a Different Catalog button, and when the catalog chooser dialog appears (I have no idea if that’s its proper name, by the way), click on Create New Catalog. You’re doing this just so you can access Lightroom’s menus (without a catalog open, you can’t get to those menus), so name it “Trash Me,” or whatever (it’s just temporary). Once it opens this empty catalog, go under Lightroom’s File menu and choose Open Catalog. In the dialog, navigate to your Backups folder (wherever you chose to save it in Step Two), and you’ll see all your backups listed in folders by date and 24-hour time. Open the folder for the most recent backup, double-click on the “.lrcat file (that’s your backup), click the Open button, and you’re back in business.” Quote Scott Kelby

BLACK FRIDAY 20% OFF LIGHTROOM CLASSIC TUTORING. IF THE LINK BELOW DOESN’T WORK. REPLY TO THIS EMAIL AND I WILL HELP YOU WITH YOUR PURCHASE. THANK YOU , BARBARA

Lightroom Classic Refresher Week 4.0 Smart Collections

Smart Collection in Lightroom Classic.

Smart Collections can be used for Automatic Organization.

  1. Choose Create Smart Collection from the left side panel pop-up menu from the + sign at the top of the Collections panel

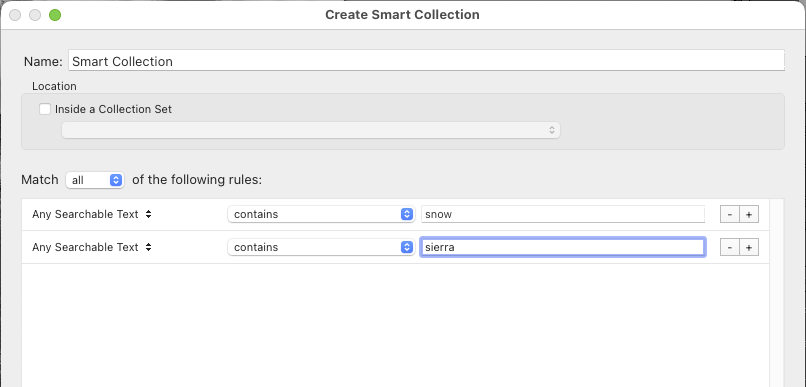
2. You will get a panel that looks like this.

There is a pop-up menu where you Choose All. It looks like this.

3. There is a menu below that drops down where you can make choices of what keywords you want to list. I am going to use the keyword “snow”. I chose any searchable text, contains, snow

4. You can choose to add other search criteria by clicking on the plus sign at the end of the panel. I chose the world Sierra. You can add to narrow the search down by adding dates, locations, ratings (flags, stars, colors)

5. Name your Smart Collection and click on Create. I named it Sierra Snow and clicked on Create. The program will search your entire catalog based on this criteria and place the images in this “smart collection”.

6. There is now a smart collection named Sierra Snow in my Collection panel. Every time from this point forward that I add a keyword to an image with snow or sierra, the software will add the image to this smart collection. Please note that smart collections have a little flower icon as a visual cue.

You can make as many smart collections as you would like. This is different then a Target Collection where you can have only one at a time.

The next blog post I will talk about Target Collections and Quick Collections.

Lightroom Classic Refresher Week 4

Lightroom Classic Refresher Week 4 - we found ourselves in the wonderful world of Collections (albums in other like software programs). What are Lightroom Collections? A Lightroom Collection is a grouping of photos. The photos can be from the same folder or from different folders all over your hard drive. When you put photos in a collection you are NOT making duplicates of the files you are putting there.

There are 3 different types of Collections:

Collections - used to group photographs together and they can be seen from all Lightroom modules

Smart Collections - you set criteria to group photos together

Collections Sets - organized collections and smart collections

Folders are used to keep photos organized. This is the Pro of the Library module and Folders - accessibility. The Con is that when you are in the Develop module working with images in a specific folder and you want to switch to another Folder, you have to return to the Library Module and click on that Folder to get the image. In other words, you have to go back and forth to find the images in folders you are working on.

Collections allows you to put those images from various folders into a collection. You can see these collections in the Develop Module (as well as all the other modules).

A Collection Set is a great organizational tool. You can put collections of like subjects into one place. Here I have created a Collections Set of a Food Portfolio I am developing.

Collections Set

You create a Collection Set by clicking on the little plus arrow next to the Header - Collections and you will get a dialog box asking you to name the Collection Set. You can then drag and drop existing Collections on top of the Collection Set and you can see them organized under the Food Portfolio Set in this example. You can add new collections under this Collection Set by right clicking on the Collection Set and creating a new collection with or without images in it.

Collections Set

Create Collection

You have a few choices when you create a collection. You can choose which Collection Set to place the new collection I am creating titled Appetizers. I can also choose to check the box “add selected photos” if I have chosen a few images and want them to be in the Appetizers collection.

I will discuss Smart Collections in the next blog post. Stay tuned.

Lightroom Classic Refresher Week 3

Staying organized from the beginning will make your Lightroom experience more enjoyable. Lightroom Classic is a reference program. Lightroom “manages” the images you import. It doesn’t matter where you keep the images (internal/external drive), they never leave the location you put them in (until you move them). Lightroom refers to them as you import and apply your edits. There is no “save as” in Lightroom. When you Export, Lightroom applies all of your edits to the image file.

Importing from your camera. This class we started by learning how to Import from the camera card.

  1. Go to the Import Module and from the Source at the top left of the Import page, select the camera card and the folder your camera put the images in. It usually is identified with DCIM

You will notice that the only choice you have is Copy. This is intended to protect the files during transfer to Lightroom. There is always a very slim chance that a file will not transfer properly. If this occurs the image is still on the camera card and can be accessed again for transfer.

2. The preview window show you what is on the card. The default has every image checked but you can uncheck anything you don’t want to import…..poor focus, accidental shots, etc. You can also Import in batches of like images by only checking those ones.

3. We have selected the where the images are coming FROM by selecting the Source. This case is a camera card. Now we will make our selections on the right hand panel labeled TO:

Choose what Previews you want to use: Minimal, Embedded & Sidecar, Standard, 1:1. Smart Preview are for laptop users.

Don’t import Suspected Duplicates: If this is checked then any image already in Lightroom will be grayed out.

Save A Second Copy To: If this is checked the program will default to the Pictures (PC: Photo) area of your hard drive and save a 2nd set of images. It is recommended to have this pointed at a second external drive that backups your images imported.

File Handling: Choose the Size of your Preview: Minimal for faster loading, Embedded & Sidecar, Standard or 1:1. Smart Previews are for laptop users

Choose: Don’t Import Suspected Duplicates, if the image is already in LR it will be greyed out

Choose: Make a Second Copy To….point the software to an additional external drive to have the images imported there as well for backup

Choose: Add to Collection… you may add to an existing Collection or create a new one, efficient if you are going to create a Collection after Import

Choose: File Renaming…there is a menu of format to choose from if you want to give your chosen files a name as they are Imported. It varies from date only, subject only, File Name and names etc.

Choose: Apply during Import….you can choose to apply a preset to the images as they are imported OR add a Copyright to the metadata on Import.

Example: I have Simple Copyright listed on the example

Choose Keywords: Click on the grey box and it turns white. You can then place your cursor in the box and type keywords relating to your images being imported. I suggest generic keywords at this stage and you can add more detailed keywords after Import. The example is Soberanes Point for the file name. Generic to the location it was photographed.

Destination: Now we need to tell Lightroom where you want to put those images. I put a checkmark next to Destination. There is a small text box there. Click and place my cursor in the text box and name my folder Soberanes Point. Scroll down and I can see that My Lightroom Folder 2 is properly chosen.
I scroll down my list of destination folders on my external drive and see that the software is asking me if I want to create a folder with the name Soberanes Point and add the images that I have selected to it. So, I check and it is there. I can now click on the Import button on the bottom of the panel and my images will be copied from the camera card, any files names or keywords will be applied and they will be put in the new folder created called Soberanes Point.


ADD METHOD: There is another method for the organized individual. Essentially, you organize your images on an external or internal drive, outside of Lightroom and then ADD them. Let me explain further.

First: Wherever you put your images make sure you have a master folder called My Lightroom Photos, Photos or anything you want to name it.

Under that main folder, create folders that are named things like Travel, Sports, Vacation, etc. Subjects that are in the genres of your photographs. Then you put or drag folders of images into those categories. Example would be Ireland put into Travel or Vacation. Little League into Sports. You get the idea. This is one way of thinking about it OR

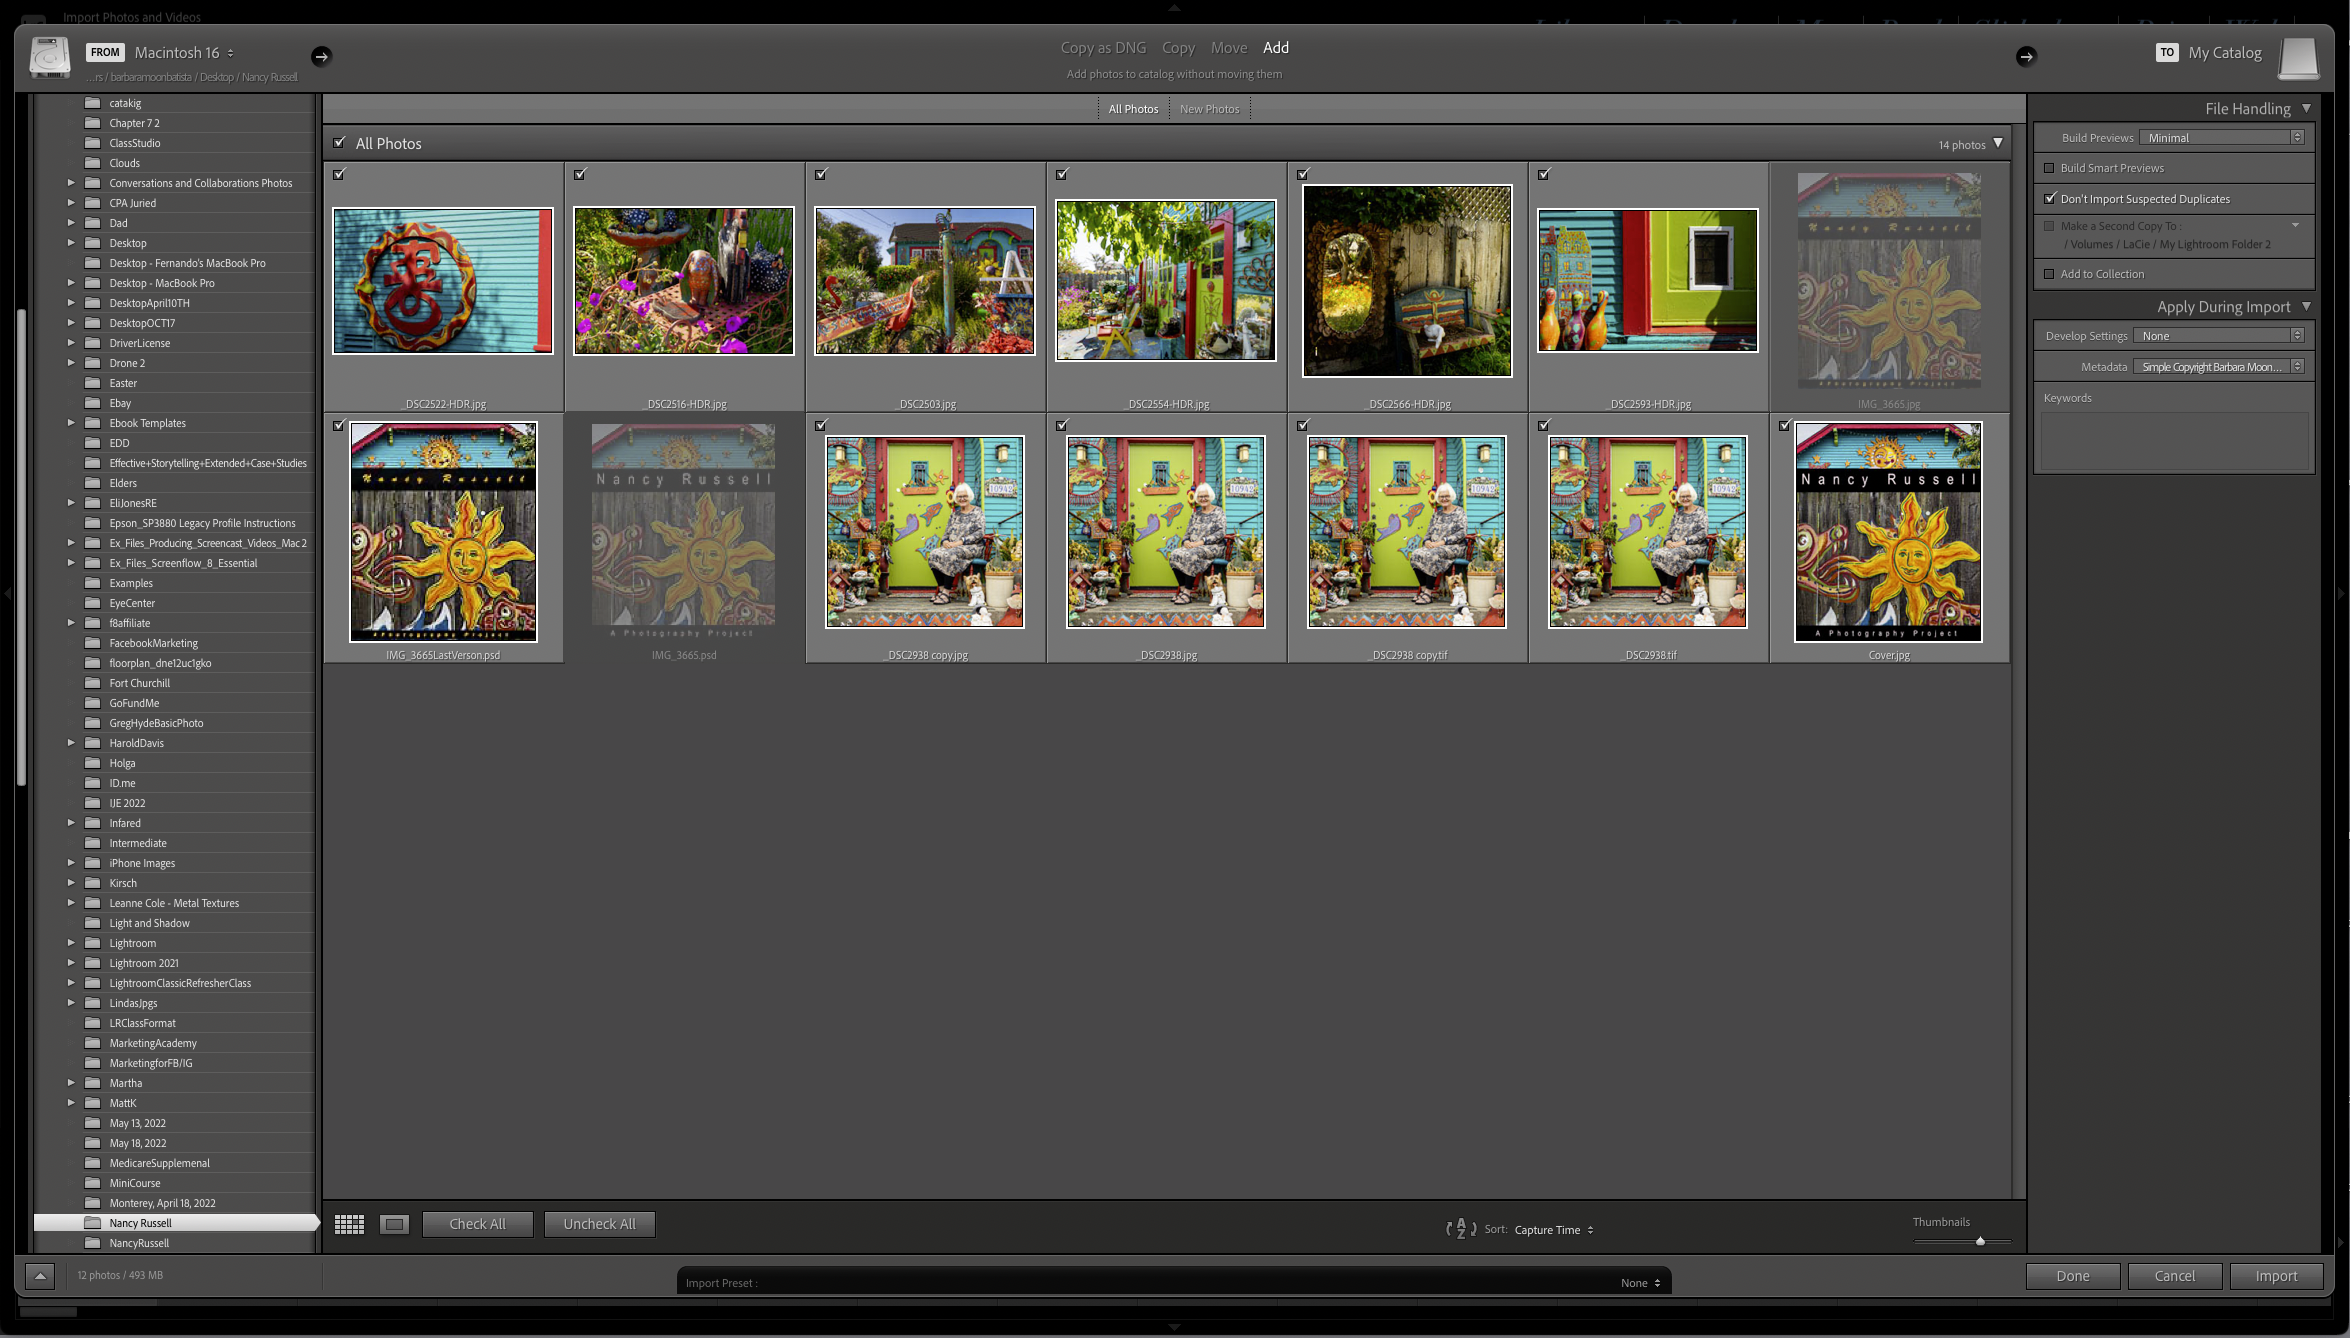
You can skip the folders titled Travel, Sports, Vacation and put or drag folders with subjects or dates under the main folder or My Lightroom Folder. Example: Here I have “added” a folder called 8x10 exhibit to My Lightroom Folder. It is highlighted in the graphic below.


When I go to the Library Module and look at my folders, there is no 8x10 Exhibit in the list. Why? Lightroom doesn't know it is there. I go to the Import page and navigate to the external drive and find the 8x10 Exhibit folder I have just dragged into my external drive. Click on the 8x10 Exhibit folder and the images inside are in the Preview window with their checkmarks already done. I choose Add in the center to tell Lightroom how I am handing these images. The right side panel is smaller now. You can choose:

Build Previews, Don Import Suspected Duplicates, Make a Second Copy To, Add to Collection, Develop Settings, Copyright and Keywords. Click on Import and Lightroom will ADD this folder to your catalog and Lightroom know where they are. See Below for the Add button and the 8x10 Exhibit showing in the Library Module

Remember: This is for those of you who can be organized outside of Lightroom and have your folders ready to go or want to take the time to organize them outside of Lightroom and then ADD them.

Important: All photographs or images in one place saves you from having to remember where they are in various places scattered on your computer, external drives, etc.


If you have read this far, thank you for the attention. I am open to questions or clarification. Week 4 will be about some of the fine points in the Library Module…Working with Folders and Collections.

Week 2 Overview Lightroom Classic Class - Library Module/Basic Importing

Week 2 began with a basic overview of what we have covered in the first week - The anatomy and architecture of the Library Module. I find that a lot of issues my students have is that they have never really explored the features of the Library Module. There were a lot of aha moments. The features of the Library Module really tell you where everything is before you begin your editing process. Staying organized from the beginning will make your Lightroom experience more enjoyable. There were a lot of aha moments as we worked our way through the various elements of the Library module. We also talked about how important it is to keep all of your images in one place, internal or external drives. How important it is to backup regularly. Getting Organized.

Library Module

Our task for the evening was to review how each person uploads their files in the past. It was quite a variety of answers. I ascertained from the descriptions that there were gaps in the understanding of the architecture of how Lightroom Class is designed. The architecture of Lightroom Classic look complex but in reality it is not really once you get the hang of it.

Myth #1: People believe that their images are “in” Lightroom. Actually, Lightroom is only managing them. The software is referencing them for each move you make in the program. When you Import, Lightroom creates a small jpeg preview for your viewing pleasure.

Myth #2: The catalog has images in it. Actually, there are no images in the catalog. The catalog records and saves every thing you do to each image during the Import and Editing process.

Myth #3: The Folder and Collections are the same thing. Actually they are not. The Folders hold the images you Import. Lightroom references them during each function you perform. Collections are like albums. You can create as many collections as you want from the images held in the folders.

Myth #4: Importing is hard. Actually, once you understand the architecture of the program and where everything lives it is easier.

I had the students put a folder of their images on the computer desktop. Just 10 or so to start. We then practiced 2 ways to Import.

Method #1: Drag and drop a folder of images onto the Lightroom Classic icon in your dock - Mac. PC would be your alias. Lightroom Classic will open and go directly to the Import page with Add Selected. We then covered some of the more important details. Where your files are coming FROM, Select Copy, Move, Add, TO with decisions about File Handling, Building Previews and what can be applied during Import. We didn’t push the Import Button. This method is best used once you are organized.

The class then selected Move and it open up the menus on the right side panel in the Import window. We talked about further decisions you can make during Import or the opportunity exists to do them later. We covered File Renaming, Apply DuringImport, Copyright, and most Important…..Destination. This is the area that trips most people up. You always want to make sure that the place you asking the computer to Move or Add the images to is selected. If you are creating a New Folder it is important to know how to do that.

If you just push Import at this point the software will do what you ask….dump them into the last folder you selected OR worse…..extract dates from the metadata and create folders with dates on them. You may have seen something like this from your own experience. It takes some skill and knowledge of the program to undo this. The time it takes is the loss. This was the moment that most of the people in the class had a realization that this was where things were going wrong with their Importing process.

We discussed how to navigate to the Main Folder where their images are kept and how to create a new sub-folder and title it BEFORE clicking on Import. Basically, you need to point the software to WHERE you want the images to live. Our class time came to an end.

Week 3: We will be reviewing what we learned and start Importing from a camera card brought by each student.

Please contact me if you are interested in tutoring or learning how to correct your Importing process.

I can be reached at barbara@batistamoon.com Please subscribe to the blog if you would like to receive more information about Lightroom.

Lightroom Classic Refresher Class Week 1 - Registration is still open

Lightroom Classic Refresher Class, Week 1 began with 6 hearty souls showing up to learn. After opening statements and instructions about campus (safety stuff) we did introductions. I asked each student why there were there and what was their sticking point. It seems Importing and the Brush Masking tools are at the top of the list. No surprise to me. When I tutor Lightroom Classic privately, we spend a good deal of time on these topics.

We began with introducing the class to where their software lives on the computer and what the catalog extension looks like and where the backups to the catalog also are stored (by default). Lots of aha moments.

The next item on the agenda was a tour through the Library Modules architecture. The important thing is to have a mental picture of where each item is and what it does. I liken it to taking a journey with a map. It is ok to get lost but more importantly, how do I get to where I am going from here.

Library Module is important. It is where we get organized and look at all of our images in “Folders”, check metadata, use search features, add keywords, create “Collections”…..and Yes, jump to the Import page.

The Import page is the part of the Lightroom Classic software where you learn to Import your images….best practices is to have them all in one place. Lightroom is a non-destructive program and only manages the photos. You decide where your images are going to live so Lightroom can find them as you do your editing. The catalog stores all the data about each image so we want to take good care of it. Keep it happy and backed up. Next Week: Importing

Week 2: You can still join this class for the next week. We are going to learn the various way you can Import and how to correct and find missing photos and folders. Thank you for reading this far.

You can register online at https://pgadulted.pgusd.org or call a human during office hours at 831-646-6580. I am available if you have questions.